
Serverless content management
In this post, I will go over how to setup a completely serverless blog that runs with no servers and is for all intents and purposes free to run!
It leverages static content generation, will be served from a content delivery network, and has a browser based UI for managing content with a review/approval workflow.
It's also highly secure, as there is virtually no attack surface for the bad guys to get a hold of.

Moving parts
- Hugo: Static site generator
- Github: Code repository. We'll use 2 repos for this project. One contains the source, and one contains the HTML that we want published (using Github pages).
- TravisCI: The continuous integration tool that we can leverage to build the site when the source gets updated.
- Netlify CMS: The browser-based content management system that we'll integrate with Github to be able to create posts straight from a browser.
- AWS Lambda: In order to authenticate the CMS with Github, we need an application in the middle to handle the OAuth2 handshake (and keep our secrets secret). We'll use a Lambda function that I wrote with the Serverless framework to do just that.
Static Site Generator - Hugo
I chose to leverage a static content site generator for this, as I wanted to keep things as simple as possible as well as ensure that the site will load fast and be cacheable.
The framework that I landed on was Hugo. Getting Hugo up and running is pretty straight-forward.
Follow the instructions in the quick-start guide, and you'll be ready for the next steps.
By the end of the quick-start, you should be able to test a working static site on your local machine.
Here's what my configuration file looks like (~/blog/config.toml):
baseURL = "https://www.control-alt-del.org/"
languageCode = "en-us"
title = "Cogito Interruptus Vulgaris"
theme = "hugo-theme-bleak"
copyright = "Mark Steele"
pygmentsCodeFences = "true"
PygmentsStyle = "perldoc"

[blackfriday]
  plainIDAnchors = true
  hrefTargetBlank = false
  latexDashes = true
  smartypants = false
  factions = true
  extensions = ["hardLineBreak"]

[params]
    cover = "/images/IMG_1191.jpg"
    Subtitle = "Mark's blog"
    description = "Everything is awesome !"

[params.posts]
    foldername = "post"
    pagesize = "6"
    featuredpost = "true"
Setup some Github repositories
Next we'll want to create a couple Github repositories to store the source and published sites. For the source site, create a repo. Mine's called 'blog'.
For the published site, I'm using Github pages, so my repo for that is 'marksteele.github.io'.
Read on here for more details on Github pages.
Set origins
Head on over to your blog source (~/blog in this example), and set the origin. Something like this:
|
|
Next we want to make sure we point our public folder to the repository we want to publish to. We'll use a git submodule for this.
|
|
Next we want to create a configuration file for TravisCI. Head on over to the blog source and create a file named ~/blog/.travis.yml with the following contents (edit to match your settings):
|
|
This job will install a few packages, then run a couple scripts. The first script ensures that submodules are pointing to the branch HEAD, and the second script generates the site. Once the site is built, the new content is published to the publishing repo.
Head back over into the blog folder, remove the public folder and setup the submodule pointing to our publishing repo. Then push.
|
|
Setup API keys in Github
Head on over to Github, in the Settings page -> Developer settings, you'll find a menu for personal access tokens. Create a token, call it something meaningful (eg: TravisCI), and give the token access to everything in the 'repo' ACL section. Copy paste that somewhere for later.
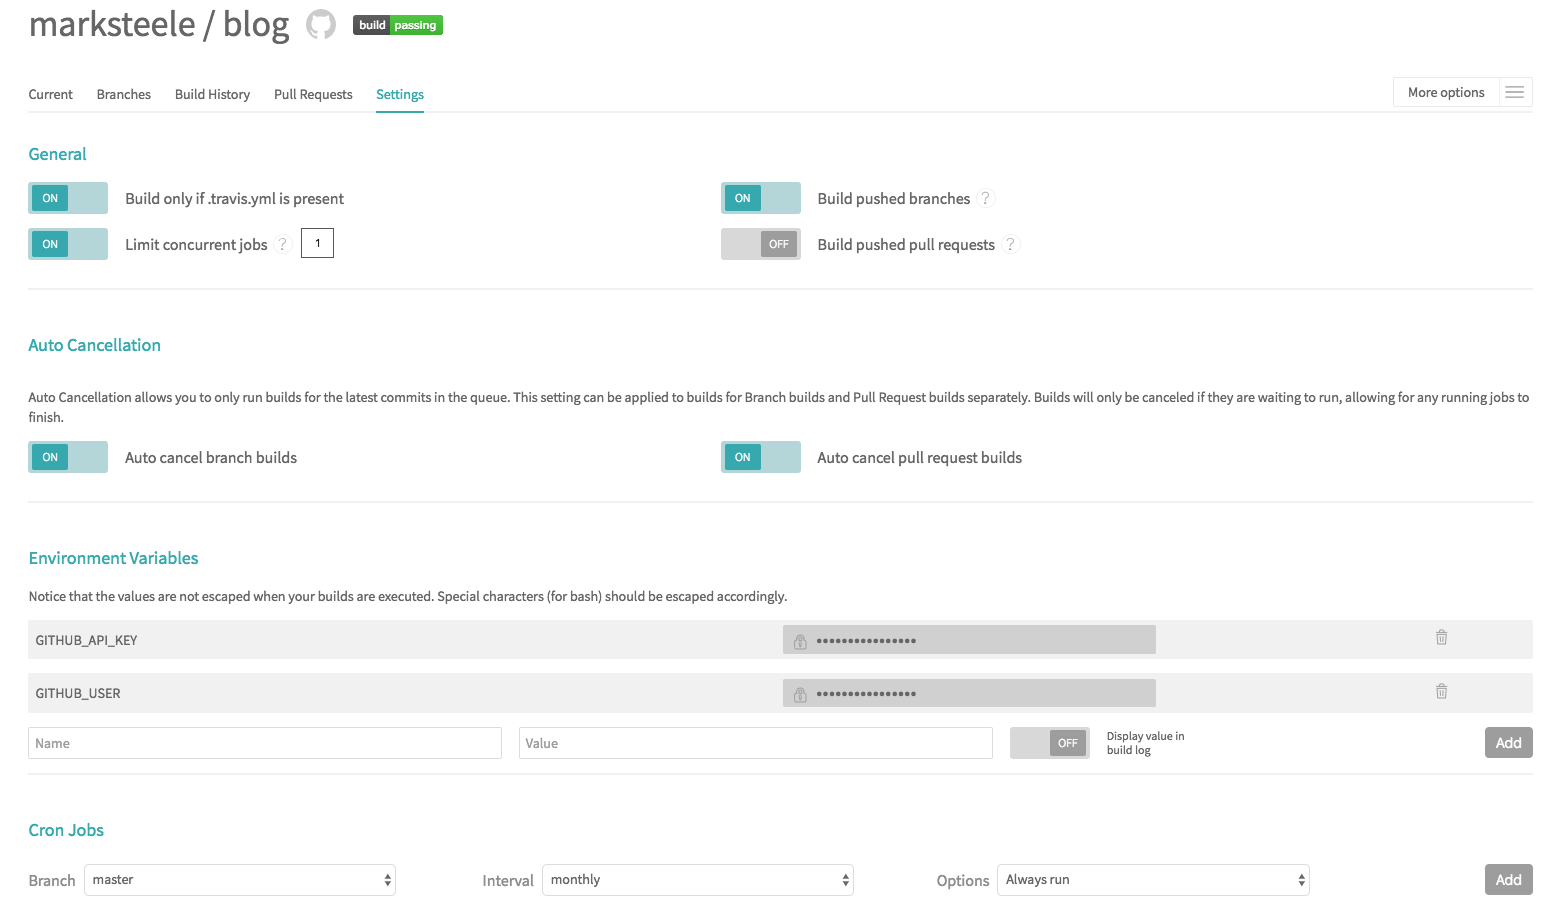
Setup TravisCI
Head on over to Travis and login. Give Travis access to your repositories. Next, navigate to the blog repo in the Travis UI, and click on the settings tab. You want to add two variables: GITHUB_USER and GITHUB_API_KEY. The GITHUB_API_KEY is the key you just created, and the GITHUB_USER is your github username.
Checkpoint - What we have so far
If all went well, at this point we should have Travis automatically triggering every time something is pushed to the blog repo, and pushing changes after running Hugo to the publishing repo.
But why stop here? Let's create a UI to make this easier for non technical folks to update content.
Authentication
Before setting up the CMS, we'll want to setup an OAuth2 middle-man to hold our secrets.
There is a simpler version of this setup that trusts the nice folks at Netlify to do this for us, but being the paranoid person that I am, I'd rather run that myself.
Since I don't expect a lot of volume on this endpoint, unless I start receiving more than a million requests a month I can run this on AWS for free.
Before continuing, you'll want to create an AWS account if you don't already have one. You'll also want to create an IAM user with API access with full admin rights.
I usually setup an AWS profile in my ~/.aws/credentials file. See here for details.
Setup Lambda function
Clone the git repository, install dependancies
|
|
Next we want to figure out what our default KMS key is in AWS for the parameter store. To do this, use the following command:
|
|
Edit the file ~/netlify-serverless-oauth2-backend/serverless.yml and update the kms_key variable in the region of your choice to reflect the output of the CLI command we just ran.
Next, time to deploy the lambda code.
|
|
This should output something similar to this:
|
|
Take note of the URLs that ends with /oauth/auth and /oauth/callback, we'll need those in a second.
Create an OAuth2 client id/secret in Github
Head on over to Github settings -> developer settings and create an OAuth2 app. The callback URL is the URL we just created (the one with /oauth/callback).
Take note of the OAuth2 client id and secret. We'll need those in a second.
Setup secrets in the AWS parameter store
Now let's configure our code to use the right parameters. Being good security conscious folks, we don't hardcode passwords or secrets anywhere and instead leverage an encrypted parameter store to store our secrets. In this case, we'll use the AWS SSM parameter store, which keeps things encrypted using KMS.
From the AWS console, head on over to either EC2 or Systems manager, then find Parameter store.
We'll want to create the following parameters (of type SecureString):
- /ctrl-alt-del/oauth/prod/GIT_HOSTNAME - The github host to use. Ex: https://github.com
- /ctrl-alt-del/oauth/prod/OAUTH_TOKEN_PATH - The token api uri path. Most probably this: /login/oauth/access_token
- /ctrl-alt-del/oauth/prod/OAUTH_AUTHORIZE_PATH - The authorize api uri path. Most probably this: /login/oauth/authorize
- /ctrl-alt-del/oauth/prod/OAUTH_CLIENT_ID - Your Github OAuth client id
- /ctrl-alt-del/oauth/prod/OAUTH_CLIENT_SECRET - Your Github OAuth client secret
- /ctrl-alt-del/oauth/prod/REDIRECT_URL - Your callback URL. It will look something like this: https://
RANDOMSTUFF.execute-api.us-east-1.amazonaws.com/prod/callback - /ctrl-alt-del/oauth/prod/OAUTH_SCOPES - The scopes to grant. Probably this: repo,user
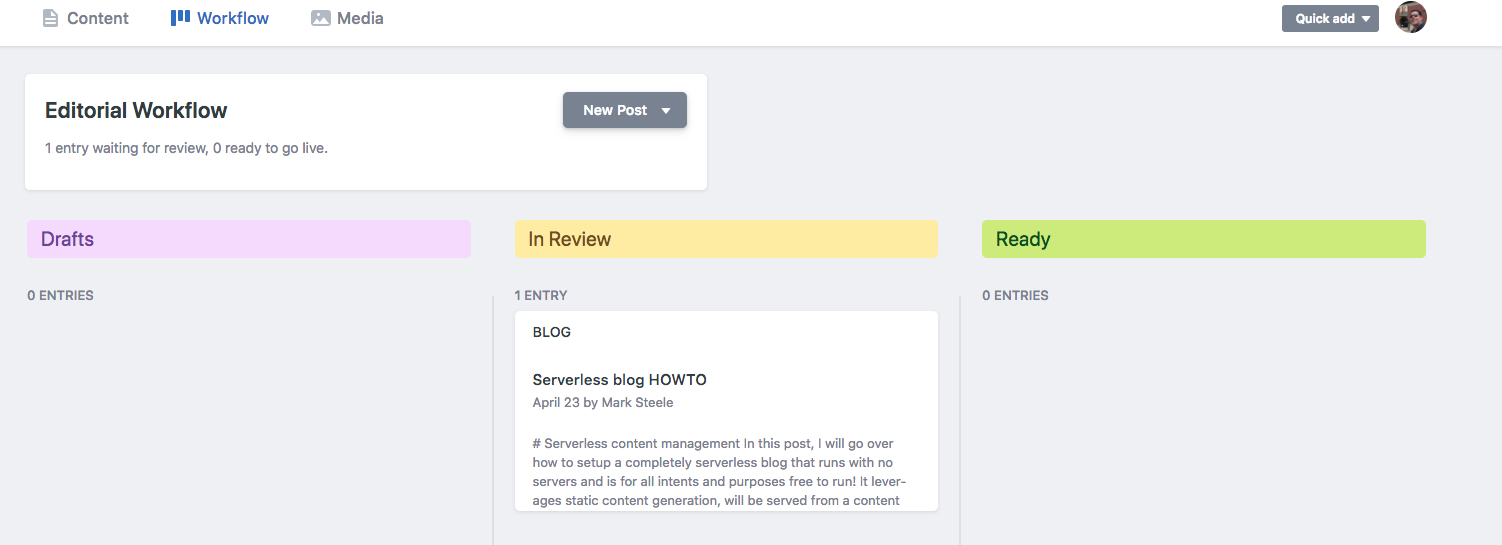
Content management
Netlify CMS is a content management system built as a React web app, which integrates into Github to allow you to edit content straight from your browser. Setting it up is as easy as dropping an HTML page into your site.
|
|
Create the CMS configuration file, edit to fit your settings (~/blog/static/admin/config.yml):
|
|
Create the CMS webpage (~/blog/static/admin/index.html):
I've created a few custom widgets to add some more Hugo markdown shortcodes. Enjoy!
Add the newly create config/html to the blog source
|
|
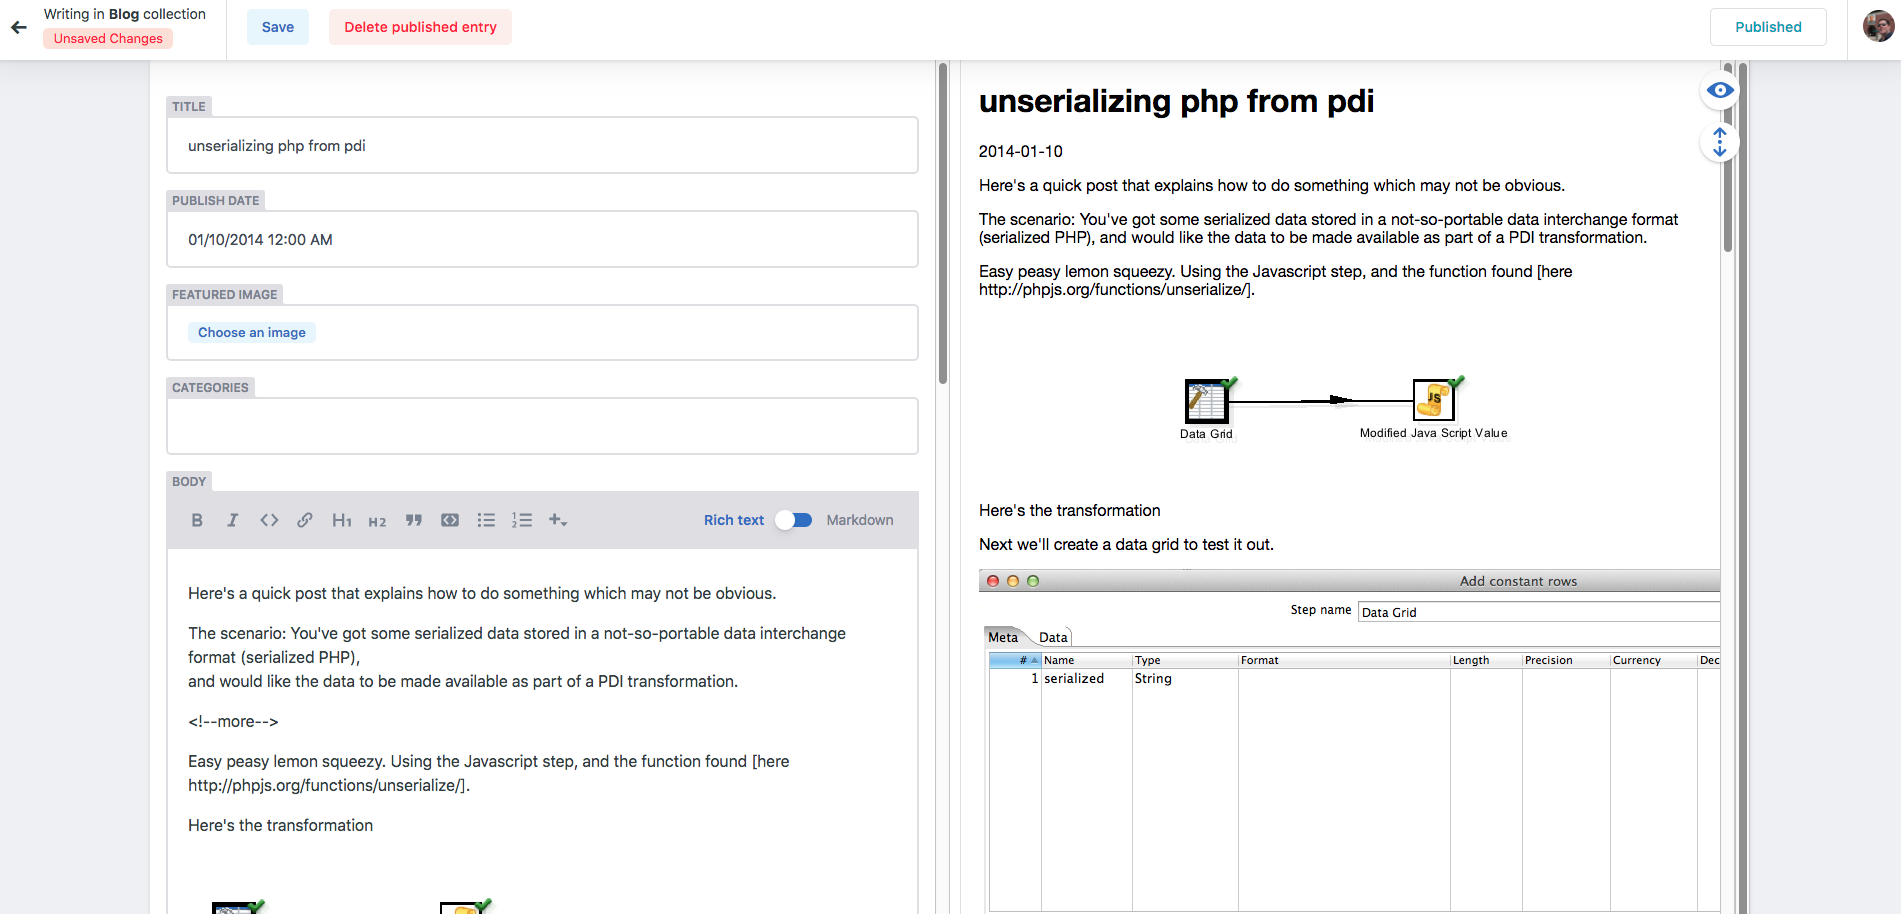
Give it a few minutes for Travis to push out the new build, then head on over to your published blog. If all went according to plan, you can hit your CMS at
https://YOURNAME.github.io/admin
You should then be able to login and start editing your files. Should look something like this:
Closing thoughts
So I lied a little bit in this post. In order to get the OAuth2 authentication to work, I had to edit the code of the CMS to fix a bug in how it was appending URL paths in the OAuth2 flow.
There is a PR open (https://github.com/netlify/netlify-cms/pull/1294) that fixes the issue, and the configuration I listed in this post assumes that the code is merged.
My site is running the branch that fixes the issue, so I assume it'll work when they merge the change upstream.
This post was written using the CMS, and I'm liking how easy it is to use.
I am serving this site using the CloudFront content delivery network, and I think I might write a small Lambda function to invalidate the CDN cache and trigger it every time the site gets published. Stay tuned!
-M
Update
Since writing this post, the PR has been merged to fix the OAuth2 flow, and that's working just fine.
I've also setup a Lambda function to be triggered by Travis whenever the build succeeds which invalidates CloudFront. Read more here. Here's the travis config.